If you’re reading this blog, you’ve probably visited the Huggingface website and you’ve almost certainly tried out one of their ‘Spaces’. These are deployed mini-applications hosted on Huggingface infrastructure. I’ve created spaces of my own, and at work I added a way for people to quickly deploy a ZenML server as a ‘Space’. I love browsing all the spaces that exist and they’re really a testament to the creativity, smartness and elbow-grease contributed by the thriving open-source community that Huggingface facilitates through their platform.
I’ve been working on my Terraform skills for a while and recently I thought up a little project that I hope will help deepen my skill-building as well as be useful for others. My goals were to build something that would:
- allow people to deploy HF Spaces (using pre-build templates) using Terraform
- allow for all the templates and not just
zenml - facilitate the full range of CRUD functionality for spaces, including renaming and deleting the spaces
- make the provider a ‘good’ one that follows best practices as much as possible
This blogpost will describe my process and some of the things I learned along the way. A special thanks to Sean Kane at SuperOrbital for writing an extremely useful blogpost that guided me on this journey (alongside the official Hashicorp documentation).
The Terraform Golden Path
What I wanted to be able to do was define my resource in something like the following manner:
terraform {
required_providers {
huggingface-spaces = {
source = "strickvl/huggingface-spaces"
}
}
}
provider "huggingface-spaces" {
apikey = var.huggingface_apikey
}
resource "huggingface-spaces_space" "zenml_server" {
name = "test-zenml-space"
private = false
template = zenml/zenml
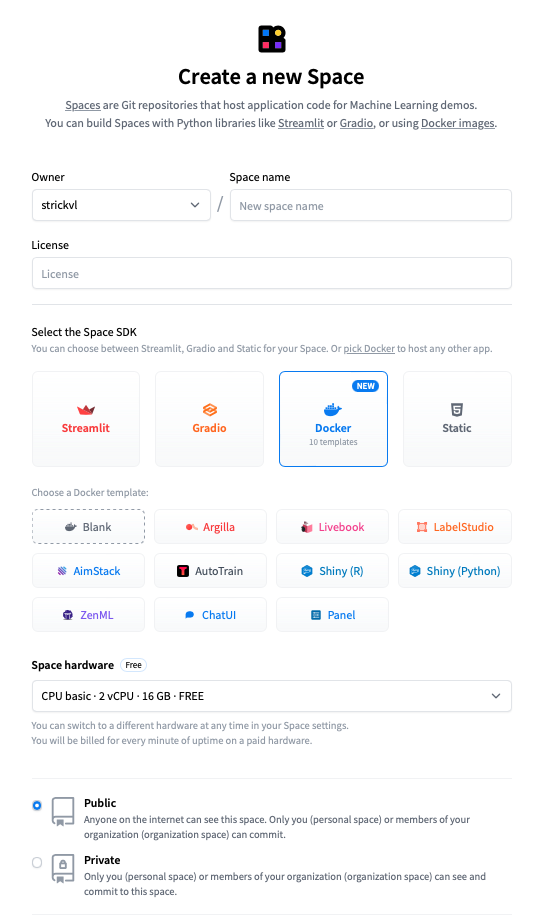
}This really simple interface would allow people to spin up Huggingface spaces without needing to click through buttons on the Huggingface website. You can get a sense of how it works if you were to do it via that web interface here:
Using HTTP Request(s) to Deploy Spaces
Internally, this web interface will just be using API calls (through some layer of abstraction) to make the deployment, so we can take a look at the Huggingface documentation and experiment a bit to find out how we can make such deployments using the raw underlying HTTP.
It’s important to have a sense of the HTTP API because this is what we’re going to ultimately be using when we write the Terraform provider. For the provider, we’ll have to use Go to define how that works so in the interests of clarity I’ll just show the HTTP requests on their own first.
There’s a useful Space by Enzo that allows you to play around with the Hub API, and the Huggingface docs cover the endpoints available for the Hub API.
For our purposes, we’re interested in the POST /api/repos/create endpoint. Note that we’re not making our query to the api/spaces endpoint, but rather to the repos endpoint. When you create a space, what you’re actually doing is creating a repository with certain custom features that Huggingface then knows to instantiate and deploy as a ‘Space’.
So as a simple HTTP request we can run the following in the terminal:
http POST "https://huggingface.co/api/repos/create" \
  Authorization:"Bearer YOUR_TOKEN_GOES_HERE" \
  type=space \
  name=test-hf-api \
  private=false sdk=docker template=zenml/zenml
You’ll need to add in your authorisation token that you create on the Huggingface site and you can change the specific template you’re creating and the name as you see fit. Running this command will do the same as clicking through the various buttons on the web interface. (I’m using the httpie CLI tool to make the request, but you could just as well use something like curl if you prefer.)
Once we’ve confirmed that the basic creation of a Space based on the template works, we can try some other commands. If we wanted to rename the space, we can ‘move’ it. (Think how renaming folders in the UNIX terminal is also accomplished with the mv command.)
http POST "https://huggingface.co/api/repos/move" \
  Authorization:"Bearer YOUR_TOKEN_GOES_HERE" \
  fromRepo="strickvl/test-hf-api" toRepo="strickvl/my-renamed-space" type="space"
And then to delete the space we can do the following:
http DELETE "https://huggingface.co/api/repos/delete" \
  Authorization:"Bearer YOUR_TOKEN_GOES_HERE" \
  type=space \
  name=my-renamed-space \
  type=space
So the API allows us to interact with the Space without using the website as expected. So far so good!
Terraform Provider Basics
At the end I want this provider to be available on the Terraform Registry for others to use, so in that case the repository needs to be named in the format terraform-provider-THE_NAME_GOES_HERE. I’ve chosen terraform-provider-huggingface-spaces.
Terraform released a framework for creating these Terraform providers which is a new (v2) way of doing this. It’s worth noting that it’s fairly new and many (most?) of the community providers you see on the Terraform registry are using the old way. There’s lots of support and even a repository you can use as a template scaffold for your own efforts. That’s what we’ll be using as well.
NEXT STEPS LIST
Followed the blog - replacing some default values from the template with ones specific to my provider - let TF use a local copy of the provider (instead of one on the TF registry (which we haven’t even published yet…)) -